<< Back to MOTIFvations Blog Home Page
Complete Guide to Sonication of Chromatin for ChIP Assays

By Anne-Sophie Ay-Berthomieu, Ph.D.
January 31, 2020
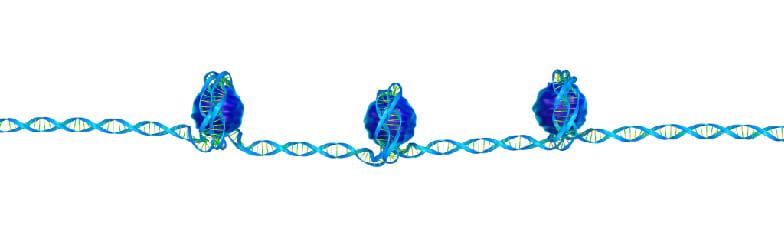
Chromatin immunoprecipitation (ChIP) is the gold standard method to analyze DNA-binding proteins and their associated DNA sequences. It is widely used to study transcription factors and cofactors as well as histones and histone post-translational modifications.
However, ChIP is a multi-step experiment where each step has to be carefully performed for successful results. In most ChIP protocols, the samples are first crosslinked and sheared, then the chromatin is immunoprecipitated using an antibody specific for the protein or histone modification of interest, and then the immunoprecipitated DNA is analyzed using next-generation sequencing or real-time quantitative PCR assays.
Chromatin shearing is one of the most important steps in the ChIP workflow and is generally the step that exhibits the most variability. Shearing can be enzymatic or mechanical (sonication), and sonication can be performed with a probe sonicator, cup horn sonicator, water bath sonicator, or focused ultrasonicator.
Each shearing technique has its advantages and its limitations. This article discusses the differences between each sonication method and highlights their pros and cons.
It All Starts with Chromatin Fixation
As mentioned above, fixation is the first step of most ChIP protocols. Fixation is used to crosslink the protein of interest to chromatin to allow investigation of factors that might be associating with chromatin dynamically or with low affinity.
The main criteria to consider when optimizing fixation conditions are what fixative to use (formaldehyde is by far the most common fixative, but there are others), percentage of formaldehyde (or another fixative), the fixation time, the fixation temperature, and the fixation quenching method.
Different fixation conditions might be required based on the cell/tissue type being used as well as the epitope of interest, so for best results, we recommend optimizing fixation conditions for each type of sample and each ChIP target.
How to Optimize Fixation Protocols
Formaldehyde can be purchased from many different vendors in powder (paraformaldehyde) or in solution (formaldehyde or formalin). Paraformaldehyde is a powder of polymerized formaldehyde without any fixative property and must be dissolved in water to release formaldehyde molecules.
Once in solution, the formaldehyde is unstable, and its fixative capacities decrease over time. This is why some formaldehyde solutions contain methanol to stabilize them. However, methanol also displays fixative properties that must be considered during fixation protocol optimization. The best way to obtain reproducible fixation results is to use freshly prepared formaldehyde (no more than 1% for formaldehyde) or single-use ampules without methanol.
The optimal fixation time and temperature will depend on the kind of sonicator that will be used, the cell/tissue type, and the target protein. Probe and water bath sonicators deliver high-energy ultrasonic waves with no control over the temperature of the sample being sonicated. Therefore, these types of sonicators generally require increased fixation time and temperature to preserve the target epitope during sonication so that it can still be recognized by the antibody that will be used in the immunoprecipitation step.
The fixation duration should be between 2 and 30 minutes (most protocols recommend fixation times of 10-15 minutes) and must be tested for each sample type and each target. To perfectly control the timing, the fixation step needs to be quenched by the addition of cold glycine.
Although formaldehyde is the most common fixative, other fixatives with longer spacer arms can also be used in association with or instead of formaldehyde. In particular, when studying some non-direct DNA binding factors, several protocols exist that use other fixatives, including dimethyl adipimidate (DMA), dimethyl 3,3′-dithiobispropionimidate (DTBP), disuccinimidyl glutarate (DSG).

What are the Consequences of Under-Fixation or Over-Fixation?
Under-fixation of ChIP samples can simply lead to the loss of the interaction between proteins and DNA. This is a problem in particular for experiments investigating co-factors that don’t bind directly to DNA and for transcription factors that bind transiently or with low affinity to DNA.
Over-fixation can create different kinds of problems. First, it can destroy the epitope of interest, making it so even the best ChIP-validated antibody will not be able to recognize the protein of interest anymore. Over-fixation can also render the chromatin difficult to shear and to obtain reproducible fragment lengths, which is mandatory for generating the highest quality ChIP-Seq data.
How Does Native ChIP Work?
While the majority of ChIP protocols use fixation at the first step to facilitate the investigation of protein-chromatin interactions, another approach called native ChIP (or N-ChIP for short) might be suitable in some situations.
Native ChIP assays use most of the same steps as traditional ChIP protocols but omit the fixation step. Since the DNA is coiled around histones, N-ChIP can be suitable for ChIP experiments investigating histone post-translational modifications and potentially also for abundant transcription factors.
Many standard N-ChIP protocols include a micrococcal nuclease (MNase) treatment to fragment the chromatin right after cells/tissue collection or nuclei isolation. This kind of protocol can be easier and shorter than standard ChIP protocols and can increase the affinity of the antibody to its target because most antibodies are generated to be specific to antigens that are not fixed. N-ChIP assays are also sometimes more efficient when working with a low amount of starting material because the chromatin recovery and mononucleosome yield is higher relative to ChIP assays with fixed samples (SA David et al., 2017, J. Brind’amour et al., 2015).
Moreover, without fixation, cells remain in a natural state and avoid any artifacts that could be generated as a byproduct of the crosslinking, so the ChIP results are expected to be closer to what is biologically relevant in your experimental system. Finally, the setup is much faster than the formaldehyde fixation protocol, which can make N-ChIP an attractive option for researchers that are new to ChIP.
While many of the points above seem to suggest that N-ChIP is a great alternative to using crosslinking in ChIP assays, the reality is that native ChIP only works well in a very small number of possible ChIP reactions. If the protein you are studying interacts with chromatin dynamically or transiently, or if the interaction is low affinity, then crosslinking is usually required to get any signal in ChIP assays. Additionally, for experiments looking at the genomic positions of histones or histone modifications, using N-ChIP is risky because nucleosomes may rearrange during digestion, leading to false positives.
Include Nuclear Isolation in Your Chromatin Prep Protocol for Best Results
Since the goal of most ChIP experiments is to analyze the binding between nuclear proteins and genomic DNA in the nucleus, ChIP assays should include a nuclear isolation step before performing ChIP for the most sensitive and specific results.
How to Isolate Nuclei Before ChIP
After fixation, quenching, and washing the crosslinked cell pellet, nuclei can be isolated with a Dounce homogenizer. A Dounce homogenizer (or Douncer) consists of a glass tube and a pestle. The pestle fits very precisely within the glass tube and moving it can shear the cells, destroying the plasma membrane but leaving the nucleus and organelles intact. Douncing is an efficient and low-cost way to isolate nuclei and it doesn’t require any specific buffers that could inhibit the downstream ChIP reactions. However, it is time-consuming and reproducibility from sample to sample or experiment to experiment can be tough and unscalable.
Chromatin can also be isolated from cytoplasmic and nuclear preparations using a gradient of sucrose. In this approach, nuclei are pelleted by low-speed centrifugation while the supernatant contains the cytoplasmic fraction.
Another fast and easy way to retrieve nuclei is to lyse cells with a buffer containing 1% Triton X-100. Chromatin is insoluble under these conditions and can be recovered by centrifugation.
Finally, a method called NEXSON (Nuclei EXtraction by SONication) was published in 2016 and uses specific ultrasound-based techniques to efficiently isolate nuclei. NEXSON consists of two main steps: resuspension of the fixed cell pellet in a buffer compatible with nuclei extraction followed by moderate sonication to isolate nuclei. The sonication time and power need to be optimized for NEXSON to work well, but the authors that developed NEXSON reported that it contributes to the generation of higher quality and more reproducible ChIP-Seq data than other nuclear isolation methods.
Is Nuclear Isolation Required for ChIP Assays?
As mentioned above, the primary goal of ChIP-Seq and ChIP-qPCR assays is to analyze the interactions between proteins and genomic DNA in the nucleus. In eukaryotic organisms, proteins are synthesized by ribosomes in the cytoplasm and the subset of proteins that are localized to the nucleus are transported there after synthesis. Without nuclear isolation, both cytoplasmic and nuclear fractions of the protein of interest are present and the cytoplasmic proteins can compete for the antibody binding during the immunoprecipitation step of ChIP assays. This increases the risk of obtaining a lower signal in the downstream sequencing or qPCR analysis.
However, nuclei isolation can be time-consuming (e.g. with Dounce homogenizer) and is sometimes not reproducible for beginners. Including nuclear isolation steps in the ChIP protocol can potentially lead to material loss, and if the starting material is already low there is a risk that there will not be sufficient chromatin remaining after isolating nuclei to perform a ChIP assay. Therefore, although nuclear isolation will generally improve the quality of ChIP assays, it is not absolutely required and could decrease the quality of data in some cases where the sample amount is limiting.
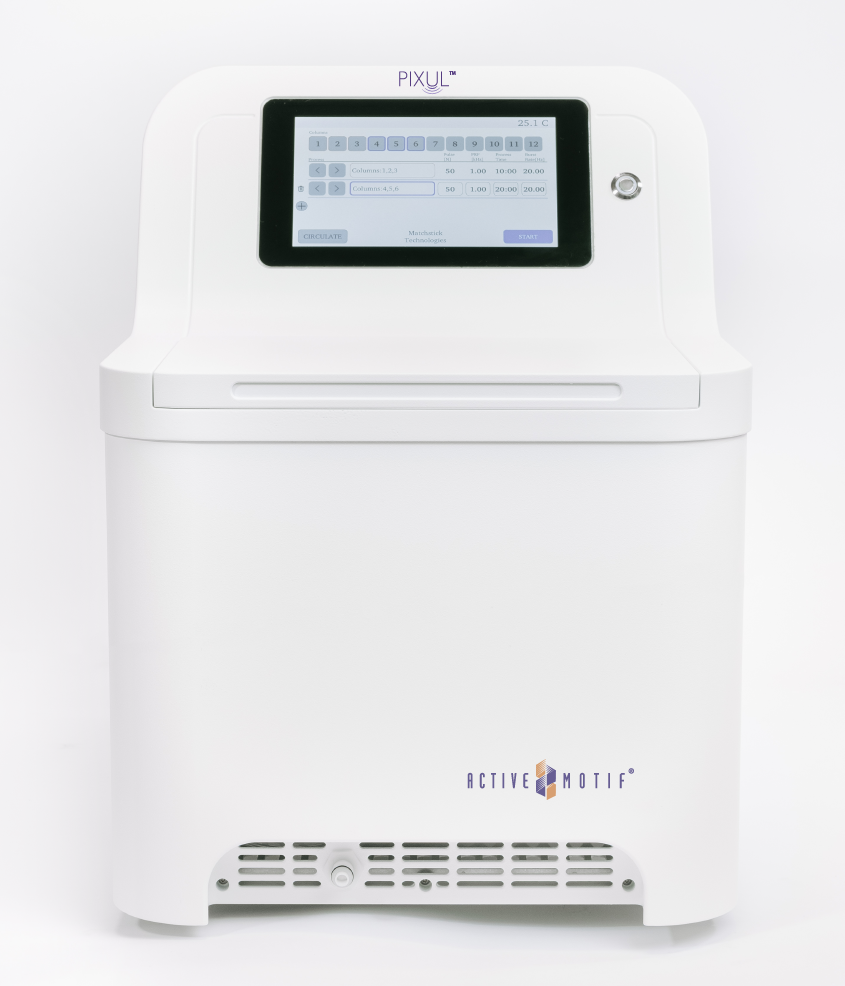
Finally, some newer sonicators, such as the PIXUL® Multi-Sample Sonicator, can process cell and tissue samples in a single buffer and data ChIP data generated with chromatin sheared with PIXUL has been demonstrated to not require a nuclear isolation step to achieve high-quality results.
To learn more about the PIXUL Multi-Sample sonicator, check out our article on PIXUL-ChIP or listen to the podcast episode below to hear our interview with Karol Bomsztyk, M.D. and Tom Matula, Ph.D., the inventors of PIXUL.
What’s the Best Chromatin Fragmentation Method?

Fragmentation of chromatin is one of the most crucial steps in ChIP experiments. Chromatin shearing must be carefully optimized for each cell/tissue type and protein target. Different methods exist to shear the chromatin, each with its own set of pros and cons.
Mechanical Shearing of Chromatin Using Sonication
How Does Sonication Work?
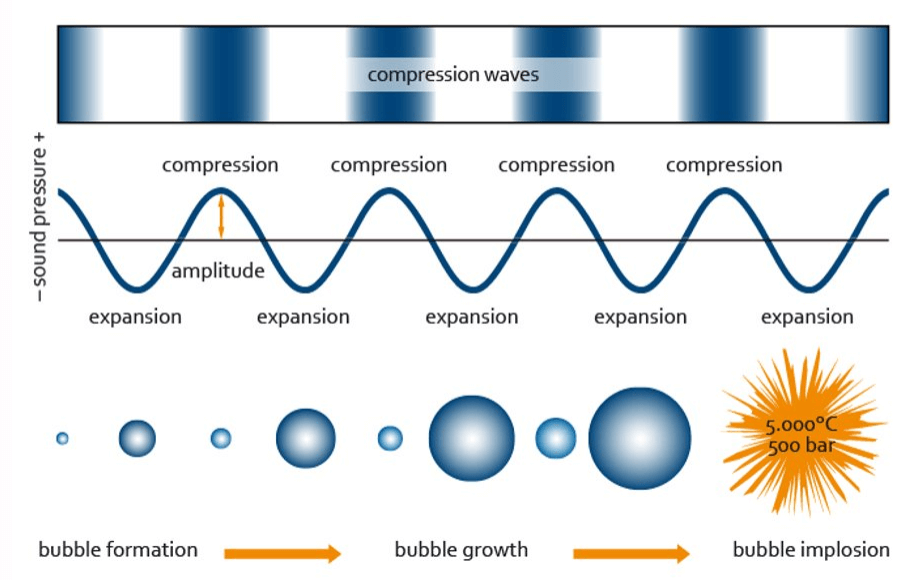
Sonicators transform electrical energy into ultrasonic energy which is transmitted to the samples being processed. The sound waves generated by a sonicator create alternating compression and expansion cycles, with rates depending on the frequency of the sound waves. During the low-pressure cycle, high-intensity ultrasonic waves create small vacuum bubbles. When the bubbles can no longer absorb energy, they collapse violently during a high-pressure cycle. This phenomenon is termed cavitation, and it is this cavitation force that results in DNA and chromatin being fragmented during sonication.
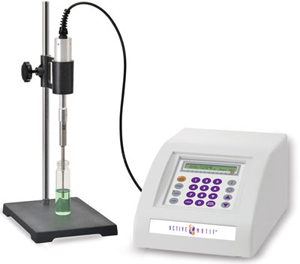
Using a Probe Sonicator for Processing One Sample at a Time
A probe sonicator is a simple device that allows sonication of one sample at a time. Probe sonicators are usually quite cheap, making them accessible to almost all laboratories. However, it is often difficult to become proficient at using probe sonicators, it’s more of an art form than a science.
An additional consideration when using probe sonicators is that the cooling system is not integrated with the probe, so scientists usually use ice buckets to keep the sample cool during sonication. The inconsistent nature of ice in an ice bucket can create different sample heating profiles between runs and therefore can be a cause of inconsistent results. Some cooling platforms that maintain the sonicator probe at the exact same depth in each sample every time exist to increase reproducibility sample to sample and maintain a low temperature.
Probe sonicators also display a high risk of contamination between samples because between each sample that is sonicated the probe is just rinsed, leaving the potential for some material to be carried over to the next sample being processed. Furthermore, the tube being sonicated are often open to all allow the probe to access so any hazardous material in the tube could become aerosolized.
Finally, and perhaps most importantly, performing sonication for experiments with multiple samples is very time-consuming when using a probe sonicator, and shearing reproducibility is often difficult to obtain.
Using Multi-Sample Sonicators for High-Throughput Chromatin Shearing
A multi-sample sonicator allows the sonication of several samples at the same time. Multi-sample sonicators use either water bath sonication technology or focused ultrasonic technology and display an integrated cooling system. This kind of device ensures reproducibility, effectiveness, and temperature monitoring. However, some multi-sample sonicators are quite expensive, and in particular plates for some commercially-available high-throughput sonicators can cost hundreds of dollars.
The specific details of different multi-sample sonicators are discussed below.
Enzymatic Shearing of Chromatin
Enzymatic shearing of chromatin usually uses micrococcal nuclease (MNase) to digest chromatin into small fragments. MNase displays both exonuclease and endonuclease activity, allowing the digestion of DNA fragment length to as small as one nucleosome. Some researchers like enzymatic shearing of chromatin because it is cheap and quick and doesn’t require any specialized equipment. Enzymatic shearing less aggressive than sonication and thus can protect the epitope of interest so that it can be recognized by the antibody.
However, digestion by MNase is biased. MNase has been shown to preferentially cut DNA at AT-rich sequences over GC-rich sequences. Heterochromatic regions of chromatin are also not as accessible to digestion by the enzyme, generating additional bias in the digestion pattern. Therefore, enzymatic chromatin shearing is not random which many researchers find to be undesirable.
Important Considerations When Performing Single-Sample Probe Sonication
When using a single-sample probe sonicator, the probe is directly inserted in the tube and the sonication is direct. The energy transfer displays high intensity to obtain the desired shearing of chromatin. Processing chromatin using a probe sonicator usually involves diluting the sample in a buffer containing SDS (0.1%-10%) that also includes protease and phosphatase inhibitors. SDS increases sonication efficiency, chromatin yield, and epitope availability. However, high SDS concentrations can potentially lead to disruption or loss of interactions of proteins that do not directly bind DNA.
Since the probe sonicator delivers high energy, the samples need to be kept cold to avoid overheating. Depending on the material available, you can use either an ice bucket or a more sophisticated cooling platform. Ice doesn’t ensure a constant low temperature and if several samples must be sonicated, it can melt. The best approach is to use a cooling platform that guarantees constant temperature during the whole sonication process as well as between samples.
Furthermore, when sonicating with a probe it is important that the probe doesn’t touch the tube side and that it is in the same depth in different samples to have consistent chromatin shearing between samples. When sonicating several samples consecutively, it is important to carefully clean the probe between each sample to avoid cross-contamination.
The number of pulses, pulse duration, and pulse intensity must all be optimized for each sample type and ChIP target to achieve the best results. As an optimization starting point, one could test 5, 10, and 20 pulses at 25% amplitude, where each pulse consists of 20 seconds of sonication followed by a 30 seconds rest period to keep the sample cold.
Keep in mind that if the nuclei are not isolated or the chromatin is very compacted, you will probably need to increase the sonication time or amplitude to achieve efficient sonication. On the contrary, if your protein of interest is at risk of being degraded, then the sonication time or amplitude should be decreased.
Key Considerations for Performing Multi-Sample Sonication
Most multi-sample sonicators use either water bath sonication technology (e.g. Bioruptor®) or focused ultrasonic technology (e.g. Covaris®). The main advantages of multi-sample sonicators relative to probe sonicators are the sonication reproducibility, the elimination of cross-contamination, and the faster processing with less hands-on time. Contrary to probe sonicators, the cooling system for multi-sample sonicators is usually integrated with the device which improves processing consistency between samples.
The Bioruptor allows the sonication of up to 16 samples at the same time and the Covaris processes up to 96 samples in each run. However, these two instruments use different approaches to sonicate the samples. With focused ultrasonic technology used by Covaris sonicators, the sonic waves for each sample are generated by a transducer located beneath the sample, ensuring that the full energy generated by the acoustic bursts is focused on the wells being sonicated. On the contrary, in sonicators that use a water bath, the sonic waves randomly travel in the liquid and the acoustic burst is unfocused, leading to a lack of uniformity between samples. Water bath sonicators usually have “hot spots” where the sonication is better, which is why these instruments often rotate the samples to ensure that all samples spend at least part of the time in these hot spots.
The frequency of the acoustic waves is low in water bath sonicators, which requires much more energy to efficiently shear cells and therefore generates more heat in the samples. Over-heating is always a concern when performing sonication because it can damage either the DNA or the protein of interest. Focused ultrasonic technology can deliver higher frequency sound waves, reducing the sonication time and heat production.
It is crucial to degas the water before performing sonication with most multi-sample sonicators because any air bubbles or contamination in the water could scatter the acoustic wave and decrease sonication efficiency. Time of degassing is device-dependent and can take several hours in some cases.
Another consideration when using multi-sample sonicators is the cost of consumables. Some sonication instruments are compatible with any kind of tube whereas others are only compatible with their specific proprietary (and expensive) plates or tubes.

The significant limitations of each of the existing multi-sample sonication technologies led Active Motif to team up with Matchstick Technologies to develop the PIXUL Multi-Sample Sonicator.
PIXUL uses an array of multiple transducers and lenses to focus ultrasonic energy and can sonicate up to 96 samples at the same time in standard and inexpensive 96-well cell culture plates. Cells can be directly cultured, fixed, and sonicated in a single plate, avoiding the need to transfer material between plates and eliminating the risk of sample loss. The PIXUL sonication platform is therefore the best instrument for high-throughput chromatin shearing.
The PIXUL cooling system is fully integrated into the instrument and the coupling fluid needs only 10-15 minutes to chill before starting each run (no degassing is required).
The PIXUL Multi-Sample Sonicator is also ideal for simultaneous sonication of multiple sample types on a single run as well as the optimization of sonication for difficult sample types since 12 different sonication programs can be applied in each run.
PIXUL technology was compared with Covaris and Bioruptor sonicators in a paper published in the journal Nucleic Acids Research. This report demonstrated that samples processed with PIXUL were sonicated with greater consistency than the same samples processed with either Covaris or Bioruptor. Furthermore, there was no cross-contamination between wells with PIXUL and the chromatin sheared with PIXUL generated high-quality ChIP-qPCR and ChIP-Seq results that were comparable to or better than results obtained using chromatin sheared with the other instruments.

The Time & Place for Enzymatic Fragmentation
Considerations for Enzymatic Shearing
Contrary to mechanical shearing where nuclear isolation step can be skipped, this step is mandatory for enzymatic fragmentation. As previously mentioned, enzymatic shearing can induce sequence bias in the fragmented chromatin and can be less efficient than sonication because MNase cannot access some regions of heterochromatin. For example, MNase will more easily access open chromatin that is being actively transcribed, so when studying repressive histones modifications such as H3K27me3, mechanical shearing is recommended. However, some researchers use enzymatic shearing in their ChIP assays because they simply don’t have access to a sonicator.
One of the main advantages of enzymatic fragmentation is that the digestion can be fully controlled by changing the incubation time, which can produce specific DNA fragment patterns corresponding to the size of 1, 2, 3 or 4 nucleosomes. Once the protocol is set up for a cell type, the results are very reproducible.
Enzymatic Shearing is Not Dead: CUT&RUN!
Although enzymatic shearing of chromatin with MNase has several disadvantages, this enzyme has been adapted for use in other protocols, such as CUT&RUN (Cleavage Under Targets and Release Using Nuclease), that are similar to ChIP. In CUT&RUN, the MNase enzyme is coupled to protein A which binds the antibody being used for immunoprecipitation and only digests chromatin surrounding the DNA-binding site of the target protein. CUT&RUN has been reported to generate less background than a regular ChIP assay and appears to be compatible with fewer cells. However, since CUT&RUN is performed under native conditions (without crosslinking) some researchers have difficulty performing experiments with transcription factors that are not very abundant or that bind to chromatin with low affinity.
Another alternative to traditional ChIP assays is CUT&Tag (Cleavage Under Targets and Tagmentation). CUT&Tag is a variation of Active Motif’s patented TAM-ChIP™ technology that uses the Tn5 transposase fused to protein A. Protein A brings the Tn5 enzyme to specific sites on the genome due to interaction with the antibody. Tn5 cuts the chromatin surrounding the DNA-binding site and inserts Illumina-compatible NGS library adapters so libraries can be generated directly as part of the immunoprecipitation step rather than requiring purification of the ChIP DNA prior to library preparation. Just like CUT&RUN, CUT&Tag is also performed without crosslinking so it shares the same limitations in that it may not be suitable for experiments investigating the binding of transcription factors to chromatin.
Tips & Tricks for Sonicating Different Sample Types
As previously explained, every step in the ChIP workflow, including sonication, must be tested for each cell type and target to achieve the best results.
ChIP assays with standard cell culture samples require between 1,000 and 5 million cells, depending on the level expression of the target of interest and the nature of its association with chromatin. As a general rule, the more cells you can have, the better the ChIP experiment will work. That some cells are harder to lyse than others and give a very low chromatin yield, and that different proteins have different expression levels in different cell types are also very important considerations when getting started with ChIP assays.
Performing ChIP with a Low Amount of Starting Material
If you work with patient samples, tissue biopsies, or sorted cell populations, you might have only barely enough cells to perform ChIP assays. In these cases, you can slightly modify the standard ChIP protocol to improve your results, avoid material loss, and in general reduce the number of steps.
The use of siliconized tubes during fixation avoids material loss by preventing the material from sticking to the tube wall. Additionally, the nuclear isolation step can be skipped when the sample amount is extremely limited. For the immunoprecipitation, you need to ensure to use a very sensitive and specific antibody that is validated to work well in ChIP-Seq assays.
A final consideration is that the library preparation method is very important for successful ChIP-Seq assays when performing experiments with limited amounts of starting material. The risk when performing ChIP with a low amount of chromatin is that PCR duplicates will be created when the immunoprecipitated chromatin is amplified during the library preparation step, and the sequencing of PCR duplicates cannot be discriminated from the signal generated from the immunoprecipitated chromatin. To solve this problem, Active Motif developed an NGS library preparation kit where the adapters contain unique molecular identifiers that allows the removal of PCR duplicates during the bioinformatic analyses.
Performing ChIP Assays with PBMCs
Peripheral blood mononuclear cells (PBMCs) are well known to be difficult to lyse, which results in low chromatin yields and poor-quality chromatin in some cases. To improve cell lysis, we recommend using a swelling buffer as well as a detergent in the sonication buffer and processing the samples with stronger sonication conditions than what is used with cell line samples.
To avoid sample loss, we don’t recommend performing nuclear isolation with a Dounce homogenizer and performing longer sonication to complete the PBMC lysis and chromatin fragmentation. To help you perform ChIP assays with PBMCs, Active Motif offers the ChIP-IT® PBMC kit that contains all the buffers needed for efficient cell lysis and a good chromatin yield from PBMC samples.
How to Do ChIP Assays with FFPE Tissue Samples
Many clinical researchers have accumulated a lot of FFPE tissue samples associated with the medical characteristics of their patients. This kind of resource is very valuable for retrospective studies, but unfortunately, it is often difficult to obtain good chromatin yield and quality from the paraffin blocks because the material is in low quantity and the fixation and embedding protocol of the tissue blocks can be either unknown or very variable from sample to sample. Moreover, the harsh fixation conditions used when preparing FFPE tissue samples can destroy protein epitopes in some cases.
When performing ChIP with FFPE tissue samples, the first step is to carefully remove the paraffin and rehydrate the tissue section. To extract and shear the chromatin, you will need to treat the tissue with a lysis buffer and sometimes perform enzymatic shearing in addition to sonication since over-fixation is common with FFPE tissues, which makes the chromatin harder to solubilize and fragment.
Before starting the immunoprecipitation and the downstream sequencing, the chromatin quality and fragmentation efficiency need to be carefully checked. Because this poses a significant challenge to most researchers, Active Motif developed the ChIP-IT® FFPE II kit to help facilitate the extraction of the highest quality chromatin from FFPE samples.
How to Analyze Chromatin Shearing Efficiency and Yield After Sonication
As previously mentioned, the sonication step is crucial for the success of all ChIP-Seq assays. Therefore, before starting the immunoprecipitation, the chromatin yield and shearing efficiency has to be verified.
The first step is to reverse the crosslinking and treat with RNase A and Proteinase K treatment to remove RNA and proteins, respectively. Then the DNA is extracted and purified, using either the classic phenol/chloroform protocol or newer methods such as purification columns or SPRI beads. The purified DNA is then quantified using either a spectrophotometer (such as a NanoDrop™) or fluorometer (such as a Qubit™).
To assess sonication efficiency, you can perform agarose gel electrophoresis with the purified chromatin. Alternatively, for more quantitative analysis, we recommend analyzing chromatin shearing using a Bioanalyzer, TapeStation, or Fragment Analyzer instruments, which are all available from Agilent. Optimal sonication shearing should result in DNA fragments between 200-600 bp in length.
When optimizing sonication conditions, it is also a good idea to check that the relevant epitope in the target protein is still recognized by the antibody and was not destroyed by fixation or sonication by performing an immunoprecipitation followed by a western blot.
Conclusion: Without Good Sonication, Nothing Else Matters
Sonication is a critical first step in most ChIP assays. If the sonication in your ChIP assay is not efficient or does not generate enough chromatin, there is nothing you can do to save the experiment, no matter how good the ChIP antibody is or how robust the rest of the ChIP protocol is. Without good sonication, you don’t stand a chance of being successful.
Chromatin sonication is crucial for several reasons. Sonication solubilizes and releases the chromatin, so this step must be efficient to obtain a good chromatin yield. Sonication is also required to generate DNA fragments that are the appropriate size (200-600 bp) to allow efficient immunoprecipitation and good peak resolution in ChIP-Seq assays.
Hopefully, by now you are convinced that sonication quality significantly influences all the following steps in ChIP protocols, from the immunoprecipitation to the sequencing. Now, let’s get your sonicators ready and start shearing your chromatin!
Advanced Sonication with the PIXUL® Multi-Sample Sonicator
Watch this short video to learn more about PIXUL®, the first and only multi-sample sonicator that delivers extremely consistent shearing of up to 96 samples processed in parallel and is fast, simple, and inexpensive to operate.
Other Resources You Might Be Interested In:
- Learn more about the PIXUL® Multi-Sample Sonicator
- Request more information about PIXUL or schedule a demo
- Read about the PIXUL-ChIP publication in Nucleic Acids Research
- Listen to the PIXUL episode on our Epigenetics Podcast
- Download the ChIP 101 eBook
- Read about how to generate the best ChIP data in every experiment
- Learn how to become a ChIP assay expert
About the author

Anne-Sophie Ay-Berthomieu, Ph.D.
Anne-Sophie was born in the south of France and grew up between the Mediterranean Sea and the Pyrenean Mountains. She grew up as a science fiction fan, leading her to specialize in molecular biology and genetics during graduate school at the University of Lyon, France (secretly hoping her research would give her superpowers!). After living in different places for work, she is back in Lyon, France where she shares her time between her husband, her family, and her friends. During her free time, Anne-Sophie challenges herself with hiking, climbing, racing, and traveling in foreign countries – while waiting for her superpowers to grow!
Contact Anne-Sophie on LinkedIn with any questions, or to tell her about your superpowers.
Related Articles
Guide to Generating the Best ChIP Data

March 15, 2019
The chromatin immunoprecipitation (ChIP) assay has become one of the most popular laboratory techniques to investigate the association of DNA-binding proteins and histones with chromatin. This article covers the major challenges of ChIP assays and how to overcome them to generate the best ChIP data.
Read More
Guide to Understanding the Benefits and Uses of Recombinant Antibodies
May 21, 2020
Antibodies are one of the most common, and most powerful, tools used by researchers. This article covers what recombinant antibodies are, and how they are different from polyclonal and monoclonal antibodies.
Read More
<< Back to MOTIFvations Blog Home Page


